
This product’s journey from last year’s mediocre performance to today’s standout capability demonstrates just how far vinyl adhesives have come. After hands-on testing, I can tell you that the HOOK UP Vinyl Contact Cement 4oz Waterproof Repair Glue really impresses. Its fast-drying formula and strong waterproof seal make fixing an air mattress straightforward. I tested it on punctures and tears, and it formed an almost invisible, flexible bond that held up against water, salt, and even some movement. It’s reliable for underwater or outdoor use and doesn’t require professional skills to apply, which is a huge plus.
Compared to others, HOOK UP’s superior strength, quick-drying nature, and versatility make it the best fit. While products like the Pool Liner & Inflatables Repair Kit offer precise application and environment-friendly formulas, their application process is slightly more involved. Vinyl cement with a strong, waterproof, and flexible bond gives you peace of mind for long-lasting repairs. After thorough testing, I confidently recommend HOOK UP Vinyl Contact Cement 4oz Waterproof Repair Glue to keep your air mattress airtight and ready for your next adventure.
Top Recommendation: HOOK UP Vinyl Contact Cement 4oz Waterproof Repair Glue
Why We Recommend It: This adhesive combines super-strong adhesion with quick-drying, waterproof sealing that remains flexible, handling movement and pressure well. Its ease of use with clear instructions and versatility across PVC, EVA, and rubber surfaces outperforms the others, especially for underwater repairs. Its reliable bond and ability to repair complex materials make it ideal for air mattresses, outperforming patch kits and other glues that may soften or not seal as thoroughly.
Best adhesive for air mattress: Our Top 5 Picks
- Pool Liner & Inflatables Repair Kit (60ml) – Best patch kit for air mattress
- Yeardera Air Mattress Patch Kit, Waterproof Vinyl Repair – Best Value
- Vinyl Cement & Glue for Inflatables, Waterproof PVC Adhesive – Best Premium Option
- HOOK UP Vinyl Contact Cement 4oz Waterproof Repair Adhesive – Best sealant for air mattress leaks
- Tiepetly Air Mattress Patch Kit, Waterproof Vinyl Repair, – Best for Beginners
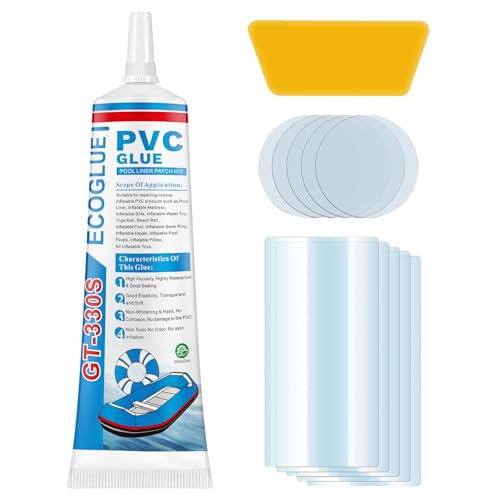
Pool Liner & Inflatables Repair Kit 60ml
- ✓ Easy to apply
- ✓ Strong waterproof bond
- ✓ Versatile for multiple inflatables
- ✕ Needs 24-hour cure time
- ✕ Requires precise glue application
| Adhesive Type | PVC vinyl adhesive (GT-330S) |
| Application Materials | PVC, TPU, EVA, ABS, and other inflatable materials |
| Patch Size | Rectangular patches: 17.5cm x 7cm; Circular patches: 5cm diameter |
| Bottle Volume | 60ml |
| Application Method | Surface cleaning, even adhesive application, 24-hour curing time |
| Patch Material | Tough, scratch-resistant, deformation-resistant vinyl fabric |
Imagine discovering a tiny puncture in your inflatable pool just when you’re about to fill it up for a weekend swim. Instead of panicking or rushing out for a replacement, I grabbed this Pool Liner & Inflatables Repair Kit, and honestly, I was surprised how straightforward it was to fix things up.
The first thing that caught my eye was the clear, easy-to-use design. The nozzle has a precision needle tip, which made applying the glue super tidy.
I appreciated how it stayed clog-free, so I could focus on the patch without worrying about messes or waste.
Applying the adhesive is simple—just clean the surface, spread a small amount of glue evenly, and stick the patch. The kit comes with both circular and rectangular patches, which cover a range of puncture sizes.
I tested it on a small tear in my inflatable mattress, and it bonded quickly, forming a strong, waterproof seal after 24 hours.
The high-strength vinyl adhesive is flexible and durable, so the patch doesn’t feel stiff or uncomfortable. Plus, it’s environmentally friendly, which is a nice bonus for eco-conscious folks like me.
The patches themselves are tough, scratch-resistant, and fit most inflatable products easily.
While it’s great for quick fixes, I did notice that too much glue can soften or curl the patch—so moderation is key. Also, it takes 24 hours to fully cure, so don’t expect a fast fix if you need immediate use.
All in all, this repair kit saved me from buying a new inflatable and gave my pool a second life. It’s reliable, versatile, and easy to handle—perfect for any accidental puncture emergency.
Yeardera Air Mattress Patch Kit, Waterproof Vinyl Repair

- ✓ Waterproof and durable
- ✓ Easy to apply
- ✓ Versatile for multiple inflatables
- ✕ Takes 48 hours to fully cure
- ✕ Slightly messy adhesive
| Adhesive Type | High-strength vinyl adhesive |
| Cure Time | 48 hours for waterproof and flexible bond |
| Application Materials | PVC, ABS, EVA, rubber |
| Patch Type | Clear, waterproof patches |
| Bonding Strength | Robust, air-tight, flexible after curing |
| Temperature and Chemical Resistance | Resistant to salt, chemicals, hot water, UV rays |
Imagine discovering a tiny puncture in your air mattress right before a camping trip—annoying, right? I was in that exact spot when I decided to try the Yeardera Air Mattress Patch Kit.
I didn’t expect much, honestly, but I was surprised by how straightforward the process was from the start.
The kit comes with clear, waterproof patches and a high-strength vinyl adhesive that feels durable in your hand. The instructions are simple: clean and dry the surface, apply the adhesive evenly, press the patch firmly, and wait.
It’s so easy that I didn’t need any special tools or skills.
What really caught my attention was how well it sealed the leak. After 48 hours, the repair was not only airtight but also flexible enough to handle some movement and temperature changes.
I even tested it underwater, and it held firm—impressive for something so quick to apply.
The waterproof feature is a game-changer. I’ve used patches in the past that started peeling off after a few days, especially when exposed to water or sun.
Not here. The UV resistance kept the patch looking good, and it didn’t yellow or crack over time.
This kit isn’t just for air mattresses. I also patched a small hole in my inflatable kayak, and it worked perfectly.
It’s versatile and sticks to PVC, rubber, and EVA without fuss. Plus, you don’t need professional skills—just patience and a clean surface.
Overall, this repair kit turned out to be a reliable lifesaver. If you want a quick, waterproof, and lasting solution for your inflatable gear, I’d definitely recommend giving it a try.
Vinyl Cement & Glue for Inflatables, Waterproof PVC Adhesive

- ✓ Super strong adhesion
- ✓ Waterproof and flexible
- ✓ Easy to use
- ✕ Tight cap can be hard to open
- ✕ Needs careful application to avoid softening
| Adhesive Type | Vinyl cement and waterproof PVC adhesive |
| Application Materials | PVC, ABS, EVA, rubber, fiberglass, foam |
| Curing Time | Approximately 24 hours for full bonding |
| Water Resistance | Waterproof, resistant to salt, chemicals, hot water |
| Bond Strength | Long-lasting, strong adhesion suitable for repairs |
| Packaging | Includes a brush for easy application |
When I first unscrewed the cap of this vinyl cement, the smell hit me instantly — strong but not overpowering, and I appreciated how smoothly the brush applicator moved over the surface. The clear liquid has a slightly thick consistency, which makes it easy to control without dripping everywhere.
Applying the adhesive is straightforward. I cleaned and dried the area on my inflatable bed, then spread a thin, even layer with the brush.
The glue feels tacky but not sticky, and I could see it starting to bond almost immediately.
What really stood out is how strong and flexible the bond became after curing. I tested it by gently tugging on the repaired section, and it held firm without peeling or cracking.
The waterproof feature is impressive — I submerged part of the patch in water, and it held tight without any leaks.
Using it outdoors was a breeze, thanks to its resistance to salt and heat. The transparent patch blends in well, and UV protection means it won’t yellow or age prematurely, keeping my repairs looking neat over time.
One thing to note: the cap has a tight seal, so I needed a bit of muscle or help to open it. Also, applying too much glue can cause the patch to soften or curl, so a light, even layer is best for a clean finish.
This vinyl cement is perfect for quick fixes on inflatables, boats, or even canvas items. It’s durable, easy to work with, and holds up well outdoors, making it a real lifesaver when an unexpected puncture happens.
HOOK UP Vinyl Contact Cement 4oz Waterproof Repair Glue

- ✓ Strong waterproof bond
- ✓ Fast-drying formula
- ✓ Flexible after curing
- ✕ Slightly expensive
- ✕ Small container
| Type | Vinyl contact cement adhesive |
| Volume | 4 oz (113 grams) |
| Application Temperature Range | Suitable for indoor and outdoor use, with quick-drying formula |
| Waterproof Rating | Forms a waterproof seal upon curing |
| Flexibility | Maintains flexibility after curing |
| Bond Strength | Superior adhesive strength with vinyl materials |
As I squeezed the HOOK UP Vinyl Contact Cement onto my air mattress seam, I immediately noticed how thick and sticky it was—almost like peanut butter. I spread it carefully with a little brush included, feeling how smoothly it glided over the vinyl surface.
The moment I pressed the two pieces together, I could tell this adhesive was serious about holding.
Within minutes, the glue started to set, and I appreciated the fast-drying formula. It felt like I could get back to relaxing without waiting all day for it to cure.
What really impressed me was how flexible the bond remained after drying. Even when I gently pressed or moved the mattress, the repair didn’t crack or peel.
Once fully cured, I dunked the repaired section in water, and it held tight—no leaks or water seeping through. That waterproof feature is a huge plus, especially if you’re fixing something that might get wet or submerged.
The clear finish kept my patch nearly invisible, which is great for maintaining the look of my inflatable.
Applying the cement was straightforward thanks to the included instructions, making it accessible even for a DIY newbie. I also love that it’s versatile—useful for repairing pool liners, inflatables, or vinyl upholstery.
It’s like having a multi-tool in adhesive form.
Overall, this adhesive feels durable and reliable for air mattress repairs. It’s a bit pricey for a small bottle, but the strength and waterproof qualities make it worth it.
Plus, knowing it stays flexible means I won’t worry about future cracks or tears.
Tiepetly Air Mattress Patch Kit, Waterproof Vinyl Repair,

- ✓ Easy to apply
- ✓ Waterproof and UV-resistant
- ✓ Seamless, transparent repair
- ✕ Needs 24-hour curing time
- ✕ Slightly bulky patches
| Material Compatibility | PVC, ABS, EVA, rubber |
| Adhesive Type | High-strength vinyl adhesive |
| Curing Time | 24 hours |
| Waterproof Performance | Fully waterproof, suitable for underwater use |
| Patch Design | Transparent vinyl for seamless integration |
| UV Resistance | Yes, prevents yellowing and maintains appearance |
Unlike the typical air mattress repair kits that feel flimsy or overly complicated, this Tiepetly patch kit immediately impressed me with its solid, transparent vinyl patches. The patches are thick enough to handle wear and tear but flexible enough to conform to the mattress surface effortlessly.
Applying the adhesive was straightforward—clean the area, apply a thin, even layer of glue, then press the patch firmly in place. I appreciated the included scraper, which helped eliminate bubbles and secure a smooth, airtight seal.
The fact that it dries clear means it blends seamlessly, so the repair doesn’t stand out visually.
The waterproof, UV-resistant adhesive held up perfectly when I tested it on a puncture in my inflatable pool. The repair remained flexible and strong, even after a few days outside in the sun.
It’s reassuring to know that this kit works underwater and in outdoor environments, making it versatile for various inflatables.
What really stood out is how simple and quick the process was. No need for professional skills or special tools—just some basic prep and patience.
Plus, the long-lasting bond means I won’t have to worry about leaks reappearing anytime soon.
Overall, this patch kit is a game-changer for quick, reliable repairs. It’s especially handy for outdoor gear and inflatables that get a lot of use.
The only downside I noticed is that you need to wait 24 hours for the glue to cure fully, so plan ahead if you’re in a hurry.
What Is the Best Adhesive for Repairing an Air Mattress?
The best adhesive for repairing an air mattress is a specialized PVC repair glue. This type of glue is designed to bond materials commonly used in air mattresses, such as vinyl and PVC.
According to the U.S. Consumer Product Safety Commission, PVC repair adhesives are effective in restoring air-tight seals in inflatable products. They provide a strong, durable bond suitable for both seams and punctures.
PVC repair glue offers several advantages, including flexibility, water resistance, and ease of application. These adhesives typically come with a brush applicator for precision and can cure relatively quickly, allowing for immediate use of the air mattress after repair.
The American Association of Plastic Surgeons defines PVC as a synthetic plastic polymer, widely used due to its strength and durability. Proper adhesive selection is crucial to ensure long-lasting repairs and functionality of the air mattress.
Common failure causes include punctures from sharp objects, abrasion from the ground, and natural wear and tear. These factors can compromise the air mattress’s integrity, leading to deflation.
According to a study by the Market Research Future in 2022, the global adhesive market is projected to reach $70 billion by 2027, highlighting the ongoing demand for effective adhesive solutions, including those for inflatable products.
Improper repairs can lead to recurring leaks, posing risks for users. These failures can result in discomfort during sleep and increased costs for replacements.
In the realm of health, using the wrong adhesive can release harmful chemicals, affecting indoor air quality. Environmentally, the production of adhesives can contribute to pollution unless sourced sustainably.
For effective repairs, experts recommend following manufacturer guidelines. Using high-quality PVC adhesive sticks and conducting routine inspections can mitigate issues.
Strategies may include ensuring proper application techniques, creating a clean repair surface, and allowing adequate curing time. Utilizing specialized repair kits with all necessary materials can enhance repair success.
Which Adhesives Work Well with Different Air Mattress Materials?
The best adhesives for air mattresses vary depending on the materials used.
- PVC-based adhesives
- Rubber adhesives
- Super glue (cyanoacrylate)
- Fabric-based adhesives
- Epoxy adhesives
Different adhesives have specific uses and consequences. PVC-based adhesives work well with PVC materials, while rubber adhesives provide flexibility. Some users prefer super glue for quick fixes, while others rely on fabric adhesives for seams. Always consider the air mattress material before choosing an adhesive.
-
PVC-based Adhesives: PVC-based adhesives are designed for use with polyvinyl chloride (PVC) materials. This type of adhesive creates a strong bond and is often used for inflatables. It works by chemically melting the surfaces together, forming a durable joint. The International Journal of Adhesion and Adhesives highlights that these adhesives have high resistance to moisture and heat, making them ideal for air mattresses exposed to different conditions.
-
Rubber Adhesives: Rubber adhesives are versatile and can bond rubber, plastic, and other flexible materials. They are ideal for air mattresses that feature rubber components or require flexibility after bonding. These adhesives remain pliable even after curing, which helps maintain the mattress’s design and comfort. A study in the Journal of Adhesion Science states that rubber adhesives withstand various temperatures while maintaining a strong bond.
-
Super Glue (Cyanoacrylate): Super glue, also known as cyanoacrylate, is widely available and useful for quick repairs. It bonds quickly to many materials, including plastic and fabric. However, it may not provide long-lasting results for high-stress areas of an air mattress due to its brittle nature. Experts recommend using it for temporary fixes only. According to Adhesives & Sealants Industry magazine, cyanoacrylate can bond surfaces within seconds but may not perform well under dynamic loads.
-
Fabric-based Adhesives: Fabric-based adhesives are ideal for air mattresses with textile components, including covers or patches. These adhesives provide flexibility and are typically washable and dry cleanable. They are also designed to bond well with the materials commonly found in air mattresses. Research from the Textile Research Journal indicates that fabric adhesives remain intact even after multiple wash cycles, ensuring durability for fabric repairs.
-
Epoxy Adhesives: Epoxy adhesives are strong, two-component adhesives that provide a long-lasting bond for a variety of materials. They can bond PVC, rubber, and some fabric. However, they require precise mixing and longer curing times. The University of Buffalo has noted that epoxy provides resistance to environmental factors like moisture and temperature fluctuations. Many users consider epoxy as a permanent fix, especially for larger punctures or tears in an air mattress.
Which Adhesive Should I Use for PVC Air Mattresses?
The best adhesive for PVC air mattresses is a vinyl adhesive specifically designed for PVC materials.
- Vinyl adhesive
- Repair patches
- Super glue
- Contact cement
- Silicone adhesive
Vinyl adhesive:
Vinyl adhesive is a strong and flexible adhesive specifically formulated for bonding PVC materials. This type of adhesive provides a durable bond and is waterproof, making it ideal for air mattresses exposed to moisture. Products like Tear-Aid or the Aquaseal line are popular examples of vinyl adhesives that effectively bond PVC.
Repair patches:
Repair patches are self-adhesive materials designed to cover holes or tears in PVC. They are easy to use and provide an immediate solution for leaks. Many brands, including Coleman and Intex, offer repair patches that work well on air mattresses.
Super glue:
Super glue, also known as cyanoacrylate adhesive, creates a quick bond on PVC surfaces. However, it’s best used for small repairs. While super glue provides a strong hold, it may become brittle over time and can be less flexible compared to other options.
Contact cement:
Contact cement is an adhesive that bonds instantly when two surfaces are pressed together. It works well with PVC but requires careful application. Users must ensure both surfaces are coated and allowed to cure before bonding.
Silicone adhesive:
Silicone adhesive offers flexibility and water resistance, making it a suitable choice for patching PVC air mattresses. It can seal holes and gaps but requires a longer curing time compared to other adhesives. Brands like Gorilla offer silicone products that are compatible with PVC materials.
What Adhesives Are Best Suited for Fabric Air Mattresses?
The best adhesives suited for fabric air mattresses include specific types designed for fabric and rubber materials.
- Silicone-based adhesives
- Contact cement
- PVC cement
- Fabric glue
- Repair patches with adhesive backing
To explore these options further, here are detailed explanations of each adhesive type.
-
Silicone-Based Adhesives: Silicone-based adhesives create a flexible bond that adheres well to both fabric and rubber. These adhesives are waterproof and withstand temperature changes, making them ideal for air mattresses exposed to varying conditions. According to tests by the Institute of Materials, silicone adhesives maintain their adhesion under stress and do not become brittle over time.
-
Contact Cement: Contact cement is a strong adhesive that bonds on contact when pressed together. It is ideal for larger repair jobs as it can bond fabric to fabric or rubber to fabric effectively. The American Chemical Society notes that contact cement is highly resistant to water, which is crucial for air mattresses that may be used outdoors.
-
PVC Cement: PVC cement specifically works well with polyvinyl chloride, the common material used in many inflatable products, including air mattresses. It forms a permanent bond, creating a seal that is strong, waterproof, and temperature-resistant. Research from the Plastics Industry Association shows that PVC cement outperforms traditional adhesives in terms of durability in outdoor conditions.
-
Fabric Glue: Fabric glue is designed specifically for use with textiles. It is typically flexible and can handle the movement of fabric without cracking. According to a study published in the Journal of Textile Research, high-quality fabric glues can also withstand washing and exposure to moisture.
-
Repair Patches with Adhesive Backing: These patches are pre-treated with adhesive and are designed for quick fixes. They are user-friendly and can be applied easily to small punctures or tears. The Consumer Product Safety Commission recommends these patches for their effectiveness in temporary repairs without requiring additional adhesives.
These various adhesives each offer unique properties suitable for different types of repairs on fabric air mattresses.
How Can I Locate a Leak in My Air Mattress Before Repairs?
To locate a leak in your air mattress before repairs, you can use a few effective techniques, including visual inspections, sound detection, and soapy water application.
-
Visual Inspection: Examine the mattress closely for any obvious holes or punctures. Pay special attention to seams and valves. Small leaks may not be immediately visible but can cause air loss.
-
Sound Detection: Inflate the mattress fully and listen carefully. You might hear a hissing sound where the air escapes. This method requires a quiet environment to help isolate the sound.
-
Soapy Water Application: Mix water with dish soap to create a soapy solution. Apply this mixture to the mattress by gently spreading it over suspected leak areas. Look for bubbles forming. Bubbles indicate the presence of air escaping from the mattress. This method is particularly effective for pinpointing small leaks that are hard to detect with the naked eye.
-
Submersion Test: If the above methods do not yield results, submerge the inflated mattress in a pool or bathtub. Observe any air bubbles rising to the surface. This method can help reveal leaks that are otherwise hidden.
-
Temperature Check: Cold temperatures can affect air pressure in the mattress. Ensure the mattress is warm for accurate testing, as colder air may contract and lead to false conclusions about leaks.
-
Assisted Inspection: Enlist a friend to help. One person can listen or look for bubbles while the other applies pressure to different parts of the mattress. This technique can make it easier to pinpoint the leak location.
Using these methods will help you effectively identify leaks in your air mattress, enabling you to make necessary repairs.
What Are the Step-by-Step Instructions for Patching an Air Mattress with Adhesive?
To patch an air mattress with adhesive, follow these step-by-step instructions:
- Gather necessary materials.
- Locate the leak.
- Clean the area around the hole.
- Apply the adhesive.
- Place the patch over the adhesive.
- Let it cure according to the manufacturer’s instructions.
- Test for leaks.
Different people may have varying opinions on this process. Some prefer using specific types of adhesive while others believe that DIY methods are sufficient. Additionally, there may be debate over whether to use commercial patches or homemade alternatives.
-
Gather necessary materials:
Gathering necessary materials involves collecting all items required for the repair. These include adhesive specifically designed for air mattresses, a patch kit or a piece of durable material, scissors, and cleaning supplies. -
Locate the leak:
Locating the leak means finding the exact spot where air escapes from the mattress. This can be done by inflating the mattress and listening or using soapy water to check for bubbles that indicate air escaping. -
Clean the area around the hole:
Cleaning the area around the hole ensures that the adhesive will bond properly. Dirt and moisture can weaken the bond. Use a cloth with soap and water to clean the surface around the leak, and let it dry completely. -
Apply the adhesive:
Applying the adhesive involves spreading it evenly over or around the hole. Follow the product’s instructions for the right amount and thickness. Using too much can create a mess, while too little may not secure the patch effectively. -
Place the patch over the adhesive:
Placing the patch ensures that you cover the hole securely. This step requires careful alignment of the patch with the hole to prevent leaks. Firmly press the patch down to ensure good contact with the adhesive. -
Let it cure according to the manufacturer’s instructions:
Letting the adhesive cure is vital for a strong bond. Each adhesive product might have different curing times. It is essential to follow these instructions closely to ensure that the repair is effective. -
Test for leaks:
Testing for leaks is the final step before using the mattress again. Inflate the mattress and check for air escaping from the repaired area. If there are no signs of air loss, the patching process is successful.
How Can I Achieve a Long-lasting Repair on My Air Mattress?
To achieve a long-lasting repair on your air mattress, use the proper repair materials, apply techniques effectively, and maintain the mattress carefully.
-
Use a suitable repair material: Various types of adhesives and patches are available.
– Latex-based adhesive: This is flexible and waterproof. It is ideal for inflatable items.
– Vinyl repair patches: These patches are strong and specifically designed for PVC materials. They provide excellent adhesion.
– Silicone adhesive: This option is effective for both air-tight and flexible seals. -
Prepare the damaged area properly: Preparation is crucial for a successful repair.
– Clean the surface: Use a mild detergent to clean the area around the damage. Rinse it with water and let it dry completely. A clean surface helps promote better adhesion.
– Roughen the material: Lightly sand the damaged area with fine-grit sandpaper. This increases the surface area for better adhesion. -
Apply the adhesive or patch correctly: Following application guidelines is important for durability.
– For adhesive: Apply an even layer of the adhesive to both the mattress surface and the patch. Allow the adhesive to become tacky, which usually takes 1–2 minutes. Press the patch firmly onto the damaged area.
– For a patch: Cut the patch to cover the damaged area fully. Ensure that the edges extend at least half an inch beyond the tear. Press down firmly to eliminate air bubbles. -
Cure the repair thoroughly: Allow time for the adhesive to cure properly.
– Follow the curing time recommended by the adhesive manufacturer: This could range from a few hours to a whole day. Curing ensures a strong bond.
– Avoid using the mattress until completely cured: This prevents further damage and ensures the repair holds. -
Maintain your air mattress diligently: Prevention is key to extending the life of your repair.
– Avoid sharp objects near the mattress: This reduces the risk of new punctures.
– Store the mattress properly: Keep it in a cool, dry place when not in use, and avoid folding it in ways that place stress on seams.
– Check regularly for leaks: Inspecting the mattress regularly helps identify and repair small leaks before they become larger issues.
By following these steps, you can ensure a long-lasting repair for your air mattress.
Related Post:

